Save
The main purpose of wallabag is to save web articles. You have many ways to do it. If you think that the article is wrongly displayed, you can read this documentation.
By using a bookmarklet
There is the How-to page. You can find this page as entry in the top
right menu named Your Account. There you have got a Add Link tab.
Almost at the bottom you can find the bag it! link. Drag and drop this
link to your bookmarks bar of your browser.
Now, each time you’re reading an article on the web and you want to save
it, click on the bag it! link in your bookmarks bar. The article is
saved.
By using the classic form
In the top bar of your screen, you have 3 icons. With the first one, a plus sign, you can easily save a new article.

Click on it to display a new field, paste the article URL inside and
press your Return key. The article is saved.
By using a browser add-on
Firefox
You can download the Firefox addon here.
Chrome
You can download the Chrome addon here.
How to use our addon
wallabagger is a browser extension to add pages to wallabag, with the ability to:
- save current page
- edit title
- add (with autocomplete!) and remove tags
- set starred and archived
- delete
Options
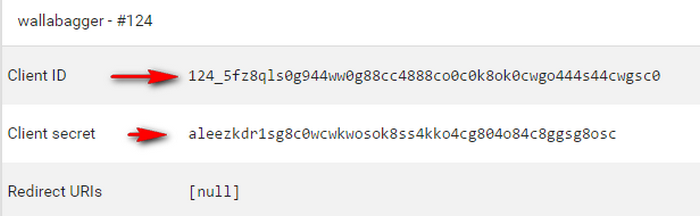
First of all you have to create a new client on your wallabag installation. How to do that is described in that part of the documentation.
What we need from that client is two strings: Client ID and Client secret.
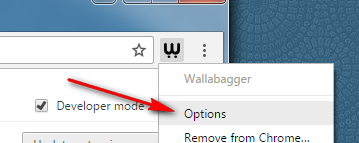
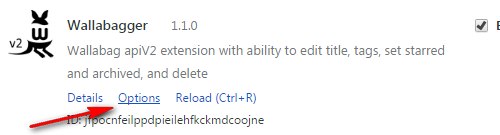
Access options page
After the installation of Wallabagger extension you can setup it by going to the options page. This page is accessible by
-
Right click on extension icon and choose menu “options”
-
Go to your Chromium-based browser extension setup page, and click on the “options” link in the Wallabagger section
Setup process
-
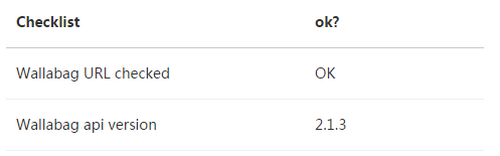
Enter the URL of your wallabag installation (without “http://” ), check “https” if you use that, and click “Check URL” button
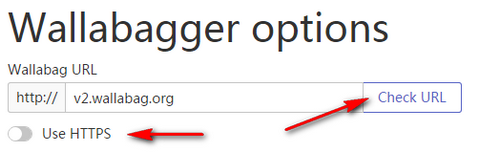
if the URL is valid then in checklist in the bottom of page will be information about that.
-
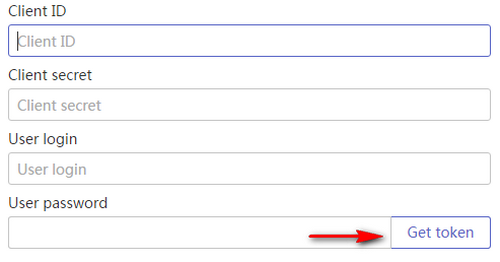
If the URL was checked and a correct api is found, then the client and user credential fields appears. Fill them and click the “Get token” button. From now access token will be fetched authomatically, when it expires.
if the credentials are correct you’ll see it in the checklist with an information about that.

-
If you have tags including spaces, check appropriate options. This will toggle the ending tag key from Space to Enter

Security warning
In this version of the extension your password is stored in the browser local storage as a plain text and could be retrieved by anyone with access to your computer. The password encryption will be implemented in future versions.
Usage
Saving article
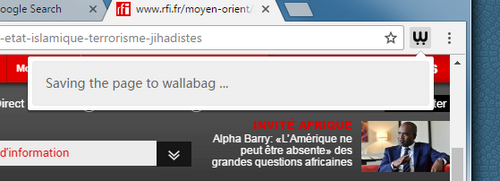
After installation and successful setup you can add articles to wallabag by clicking on the Wallabagger extension icon
![]()
wait a couple of seconds
(There also may be message “Obtaining wallabag api token” if the application token is expired (once in two weeks)) If something goes wrong, an error message appears:
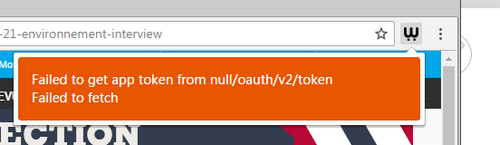
In that case, check your options.
If there was no errors, main window with saved article appears. Note: if the article from this URL was already saved, this article will appear with its tags, title, and flags (starred, archived).

Article window
The article window consists from:
- the article picture
- the title - clicking it opens article in the wallabag interface

- domain name - clicking it opens source article

-
icons:
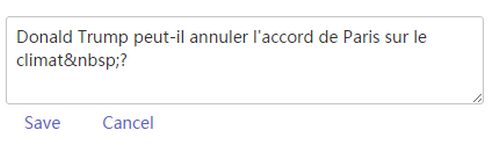
- edit title icon
 clicking it opens dialog to edit the title
- set archived and starred flags icons
 These icons change its appearance when the flags are set
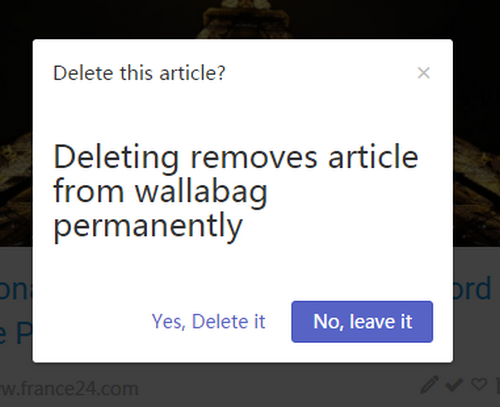
- delete article icon
 clicking it opens a confirmation dialog to make sure you want to delete your article
- edit title icon
-
tags area: article tags with input field for adding new tags

Working with tags
Tags applied to the article appear in the tags area before the input field. You can remove a tag from an article by clicking on the cross symbol next to the tag.

When you type the name of a new tag in the input field, after three letters, Wallabagger begins to search in existing tags. Found tags appear on the bottom of the input field. You can add them by clicking on them or by pressing the right arrow key.

You can add typed in input field tag by pressing “,”, “;” or the Space key (if you didn’t checked the option “Use space in tags” inside the extension settings) or the Enter key (if you checked the option)
By using your smartphone
Check the dedicated page for the mobile apps.